Whenever you'll delete any file or folder, it will get transferred to Recycle Bin automatically. You'll need to clear the recycle bin after deleting any documents or files. It is good feature for many people who deletes files very often. You can delete some important file when you're deleting many-many files at the same time. This feature is built to allow you to restore files if you ever have second thought or if you deleted an important file accidentally.
If you think this feature is annoying and you don't need it any more then you can follow few simple steps to skip Recycle Bin whenever you delete a file or folder. You can also disable warning message when you delete (not recommended). I will show you how to disable this, but make sure you really want to stop moving files to Recycle Bin because after disabling this you won't be able to restore deleted files. Fortunately, there are many recovery software available for Windows (Google it!).
Read: Recover Deleted Photos in Android Phone. You can recover other files too.
You can bypass Recycle Bin by clicking SHIFT key when you delete any file or folder.
If you think this feature is annoying and you don't need it any more then you can follow few simple steps to skip Recycle Bin whenever you delete a file or folder. You can also disable warning message when you delete (not recommended). I will show you how to disable this, but make sure you really want to stop moving files to Recycle Bin because after disabling this you won't be able to restore deleted files. Fortunately, there are many recovery software available for Windows (Google it!).
Read: Recover Deleted Photos in Android Phone. You can recover other files too.
You can bypass Recycle Bin by clicking SHIFT key when you delete any file or folder.
- Right click on folder or file while holding the SHIFT key.
- Click on Delete button from the Right click menu.
- Deleted file won't go to Recycle Bin.
You can also delete file (bypassing recycle bin) by pressing SHIFT + DELETE key. But if you don't want to use SHIFT key while deleting then you can permanently bypass the Recycle Bin by changing some simple settings of the Recycle Bin.
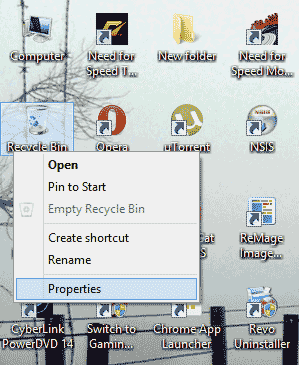
- Right-click on the Recycle Bin, and then click Properties.
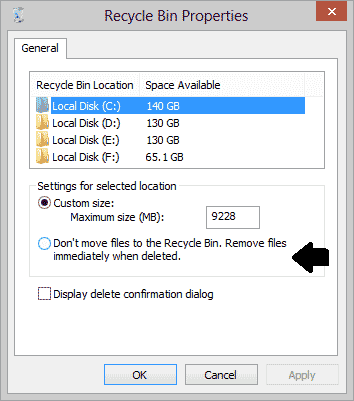
- In the Recycle Bin Properties dialog box, click or select Don't move file to the Recycle Bin... check box.
Note: You will see all the drive in the Recycle Bin Location (see image given below). Disable bypassing option for all the drives one by one or select a single Hard Disk drive only depending on your requirements. It is recommended to not to change this option for the drive in which the Operating System is installed.
- Click on Apply button. Now the files won't move to Recycle Bin whenever you'll delete a file.
- Click to select Display delete confirmation dialog check box. Do this if you want to receive a warning before deleting files otherwise leave it unchecked.
- Click OK.
Bypassing Recycle Bin will save disc storage and you'll not need to clear/empty the Recycle Bin. If you disabled this step then always be cautious while deleting any file, otherwise you'll not be able to restore it.
Great of this, also here is another way that can recover deleted files from SD Card on Android
ReplyDelete