How to Find Blogger Widget ID and Section ID

Today we will know how to find the widget ID in Blogger blog. Let us assume that you want to change the font style of a widget which is located in the sidebar of your Blogger blog. But if we change the Font style of sidebar than it will apply that font style to all the widget located in the sidebar. So to make changes of font style of particular Widget located in Blogger blog we have to know the widget ID of that Widget or Gadget.Actually Blogger assigns a unique Section ID and Widget ID to every Widget without telling anything about it. It means we have to find out the Widget ID of the widget in which we want to make changes manually. And after finding the widget ID we can make changes to widget as it is shown below.
#Widget ID-Here {font-family: Arial;}
See above again I have added a pound sign (#) before the element ID/ Widget ID. It is important to add a pound sign before any ID in the CSS. Now we can add that CSS style code in the CSS area of our Blogger blog. But first we should know how to get the Widget ID of Blogger blog. For that see the steps given below.
  • You will first sign in to your Blogger blog if aren't signed in now.
  • Now after that Click on the Blog Title from the Blogger Home Page in which you want to make changes.
  • Now after that locate to Blogger Home > Layout and than locate the widget in which you want to change the style.
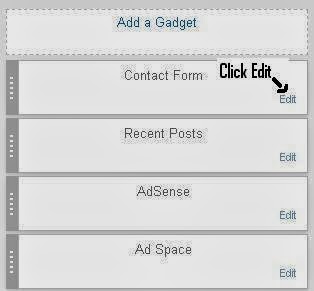
  • Now click on the Edit link on the widget of which you want to know the Widget ID and Section ID. See the image given below to know where is the Edit Link on the Widget.
How to Find Blogger Widget ID and Section ID
  • After clicking on Edit link a window will Popup which contains all the configurations of that selected widget. See the image below of the Popup configuration of that Widget.
How to Find Blogger Widget ID and Section ID
Look Image Carefully
  • Now we will need to maximize the window to see the Full URL in which the Section ID and Blog ID is Written. See the image of the maximized window of my Recent Posts widget given below.
Find Blogger Widget ID and Section ID
See Widget, Section and Blog ID in circle
  • If you can't see my Widget URL properly in the above image than see the URL given below in quotes.
http://www.blogger.com/rearrange?blogID=7566508821197325178&action=editWidget&sectionId=sidebarright&widgetType=null&widgetId=HTML2
Now you can see that my Widget ID of Recent Post is HTML2 and the Section ID is sidebarright. You can also see the Blog ID of your Blogger blog. At last we got it in a very easy way.

That's all! We have finished our goal in finding the Blogger Widget ID and Section ID without viewing any HTML code. Now we can apply any CSS code and Styles to the particular Widget of Blogger blog by finding it's unique Widget ID. If you need any kind of help than feel free to ask me.
Comments

Popular posts from this blog

Need for Speed (NFS) Carbon Cheats, Codes and Unlock Parts

Need for Speed makes some great racing games like NFS Most Wanted, Rivals etc. and Need for Speed Carbon is another 10th addition to their NFS series. It's the first game to get the PEGI rating 12+. It's a very good game with it's story line. If you are looking for some adventure and a good racing than this one will be in your game list. While playing the game you will face some difficulty in completing this game. And from than onwards you may look some cheat codes that can help you in completing NFS carbon. And to make it easier for you here is the list of some working cheat codes and trainer. But you proceed to know about cheats and tricks for Need for Speed Carbon you would like to know the adventurous story of the game. So let's start. The game is set in the fictitious city of Palmont. Soon after the player leaves the Rockport City ( remember jumping of an old bridge in last scene of NFS Most Wanted) the player drives on a route to Palmont city with his BMW ca...

How to Watch Any TV Show or Movie on Kodi

Kodi is a cross-platform media center solution developed by XBMC/Kodi Foundation, a non-profit technology association. Kodi which was previously known as XBMC has been growing rapidly from last few years. While the application offers to play local media files, but, it has plethora of third party add-ons, which, we can use to increase it's usefulness. In this post, you'll learn the process to install Indigo and Exodus on Kodi 18 (64-bit). The process is similar on version 17 of this app, however, I haven't checked the previous versions. Note : Streaming copyrighted content is illegal, nevertheless, it's completely legal to use Kodi for viewing the content you've purchased. First, we'll need to add Indigo Installer. Follow the following steps to know how to do it: Open Kodi . Click on the Gear button (settings). Select File Manager . Double Click on Add Source . Click on <None> ... ...type  http://fusion.tvaddons.ag and...

Top 5 Alternatives to Extratorrent

In an unforeseen move, Extratorrent decided to shut down few months ago. It was one of the most popular torrent site, but now users who visit it's homepage are greeted with a message which clearly states they are not going to return in the future. Now that they are gone, various clone sites such as extratorrent.cd has been setup to squeeze money from the confused visitors via its advertisements. People visiting these clone sites should know that the original ExtraTorrent owners have deleted all data, and none of the impostors have access to the old ExtraTorrent files. There are many alternatives out there. You just need to look at the right place. Take a look at the following original torrent sites which might entice you. 1337x.to 1337x is probably the best designed torrent site you'll ever come across. Although it lacks the ExtraTorrents' rating system, nonetheless, most of the contents are verified by moderators. The site has easy-to-navigate subsections whic...